Install an Elkor ETport to connect your RTU meter to a IP network
Why do I need this?
The Elkor ETport is a modbus TCP "listener" device that is designed to read any modbus RTU device data and make that available on a modbus TCP/IP network. This device is required on Denowatts sites that utilize RTU-based meter communications.
How do I install the ETport?
The ETport installation takes minutes to install and requires communications/power wiring and a laptop with an ethernet port.
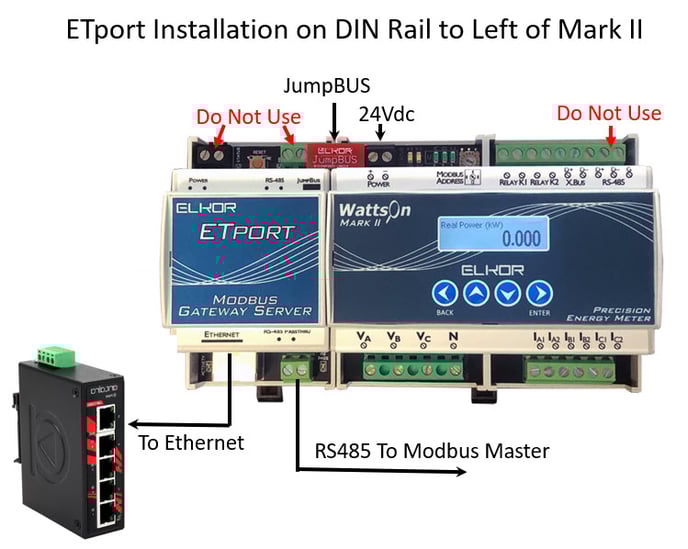
- Secure the ETport to the DIN rail immediately to the left of the WattsON Mark II meter. If there is no space, see Alt Installation below.
- Attach the JumpBUS connector board as shown.
- If already installed, relocate the RS485 wire from the Mark II (top right) to the ETport (bottom right).
- Connect the ETport to the ethernet switch via CAT5 cable.
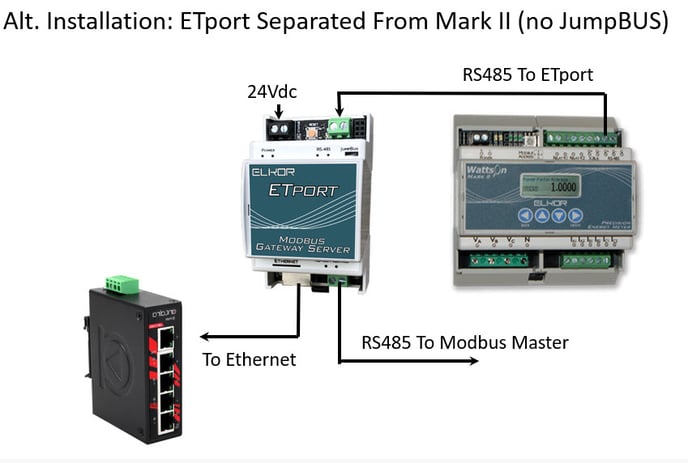
Alternative Installation
If there is no DIN rail space immediately to the left of the Mark II meter, not to worry! You can install the ETport without the JumpBUS.
- Mount the ETport on available DIN rail with the cabinet.
- Supply 24Vdc power to the ETport directly.
- Relocate the RS845 connection from the top right of the Mark II to the bottom right of the ETport.
- Add a new RS485 from the top right of the Mark II to the top right of the ETport.
- Connect the ETport to the ethernet switch via CAT5 cable.
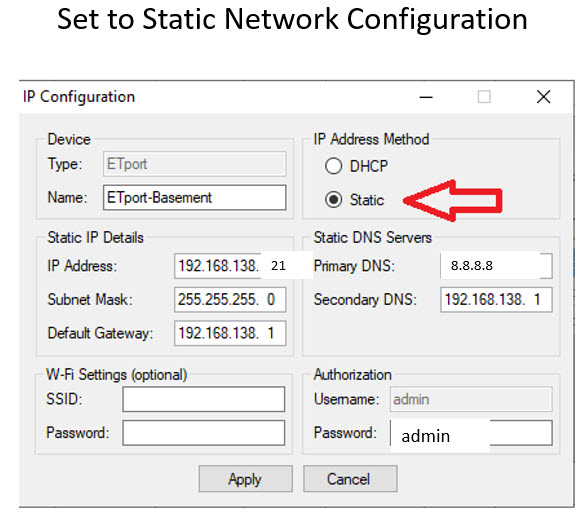
Configure the ETport Network Settings
Once installed, the final step is to set a static network configuration.
- Connect your computer to the ETport via ethernet cable.
- Using the Modbus Commander utility (downloads from Elkor.net), connect to the ETport.
- Use Device Finder to identify the ETport. Click Network Configuration.
- Change from DHCP to Static.
- Change the last position of the IP address to ".21", unless otherwise directed by the network administrator.
- Change the Primary DNS to "8.8.8.8"
- Add "admin" in the Authorization Password field.
- Click "Apply". You are done configuring the network settings.
Once the ETport is configured, please note the "Unit ID" of the meter (under modus settings on the LCD) and report this back to Denowatts along with the final IP address assigned to the ETport.
Please send the final network configuration and modbus Unit ID to support@denowatts.com